 Czech
Czech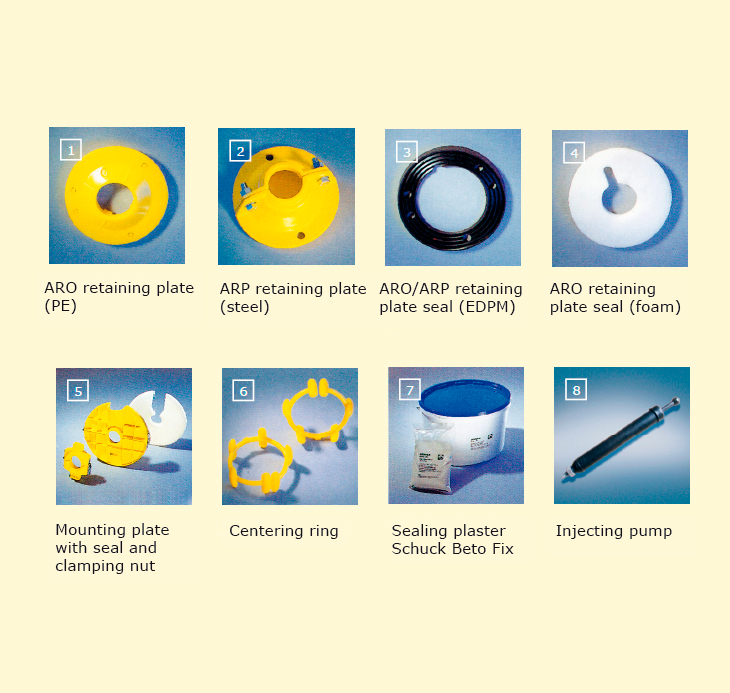
Accessories, examples of installation
6.1
Catalog sheet: 6.1-4
To ensure proper and faultless installation of combined household connections, it is necessary to use accessories supplied by the system manufacturer and observe the installation procedures. It is namely the use of Schuck Beto Fix sealing plaster, which guarantees that the required parameters of transmission through the outer wall are met.
| No. | Name | Intended for | Catalogue No. |
| Wall disk ARO, yellow, DN25 | HSP - gas | 610-4000-025 | |
| Wall disk ARO, yellow, DN32/DN40 | HSP - gas | 610-4000-032 | |
| 1 | Wall disk ARO, yellow, DN50 Wall disk ARO, black, DN25/DN32 |
HSP - gas WHP - water |
610-4000-050 610-4010-025 |
| Wall disk ARO, black, DN40 | WHP - water | 610-4010-040 | |
| Wall disk ARO, black, DN50 | WHP - water | 610-4010-050 | |
| Wall disk ARO, DN25 | 610-4020-025 | ||
| 2 | Pull-out protection plate ARP, DN32/DN40 | 610-4020-032 | |
| Pull-out protection plate ARP, DN50 | 610-4020-050 | ||
| 3 | Sealing ring for ARO from EDPM DN25 DN50 | 610-4030-025 | |
| 4 | Sealing ring for ARO from foam DN25 DN50 | 610-4040-025 | |
| Wall finishing set No.1 | HSP-gas DN25 a WHP-water DN25/DN32 | 610-4050-025 | |
| Wall finishing set No.2 | HSP-gas DN32-DN50 a WHP-water DN40/DN50 | 610-4050-032 | |
| 5 | Wall finishing set No.3 Sealing ring for ARO from foam No.1 |
HSP-gas DN50 a WHP-water DN50 HSP-gas DN25 a WHP-water DN25/DN32 |
610-4050-050 610-4060-025 |
| Sealing ring for ARO from foam No.2 | HSP-gas DN32/DN40 a WHP-water DN40 | 610-4060-032 | |
| Sealing ring for ARO from foam No.3 | HSP-gas DN25-DN50 a WHP-water DN25-DN50 | 610-4060-050 | |
| 6 | Centering ring DN25-DN50 | 610-4070-025 | |
| Schuck-Beto-Fix 2kg | 610-4080-002 | ||
| 7 | Schuck-Beto-Fix 12 x 2kg | 610-4080-012 | |
| Schuck-Beto-Fix 25kg | 610-4080-025 | ||
| 8 | Cartridge gun | 610-4000-010 |
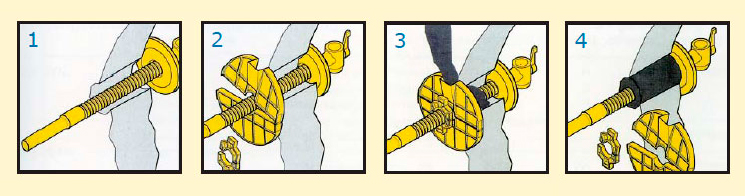
- Insert the bushing into the drilled or cut hole in the wall so that the retaining plate seats on the wall surface.
- Place the mounting plate onto the bushing end with threaded part and clamp it using the clip. Then place the clamping nut and clamp it as well.
- Align the bushing in the hole (the funnel on the mounting plate must be on top), tighten the clamping nut to securely press the mounting plate onto the wall surface and pour the sealing plaster Schuck Beto Fix into the funnel.
- During setting of the mortar (approx. 15 min.), you can continue installing the piping. The mounting plate with clamping nut can be removed after the plaster sets, or later. The retaining plate remains on the inner surface of the building’s wall.
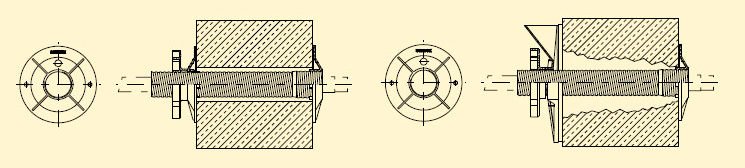
| Example 1: If the hole is precisely drilled, you can use two ARO retaining plates and concrete injecting pump for installation. |
Example 2: If the hole is drilled or cut and its walls are slightly damaged, use the ARO retaining plate and a mounting plate for installation. |
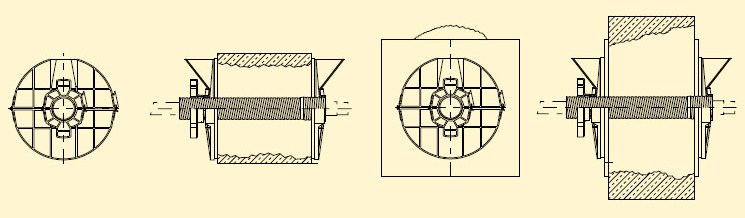
| Example 3: In case of uneven hole of up to 250mm in diameter, you can use mounting plates on both sides for installation. |
Example 4: In case of uneven hole of over 250mm in diameter, place the auxiliary retaining plates and continue as in Example 3. |